Tuesday, December 30, 2014

pcDuino3 Nano - Postfix Install and Setup via Webmin

This is another in the series documenting my setup of a new home server with the Linksprite pcDuino3 Nano.  A listing for the entire series can be found here.  More information on the pcDuino3 Nano can be found at Linksprite’s website and the pcDuino website.

The next step in setting up my home server was to setup email so that I could relay messages from the server through gmail for monitoring purposes.

This is part of my pcDuino3 Nano series of posts but it should work for webmin on other systems.

Install Postfix from Webmin

From the Webmin menu select Un-used Modules (1), scroll down and select Postfix Mail Server (2).  Then on the resulting page select Click Here to install (3).

image

This will install Postfix.

WebminPostfixInstall

Go back to the Webmin menu and select Servers (1), Postfix Mail Server (2) and then SMTP Authentication And Encryption (3).

image

Enter “[smtp.gmail.com]:587” in the Send outgoing mail box (1), then enter your user name (2) and password (3) and press Save and Apply (4).

image

Back on the Postfix Mail Server page select Virtual Domains (1).

image

Then add a mapping file by selecting the radio button (1) next to Map specification and then select “…” to the right of the box (2) and it will bring up another window.  In this window add a mapping file (3).  I used /etc/postfix/generic.  Then select Save (4) in that window and Save and Apply (5) in the original window.

image

This will take you back to the Postfix Mail Server page where you will again select Virtual Domain.  This time you want to add a new mapping (1).

image

Add a description for the mapping (1), the local username (2) and the username it maps to (3).  Then select Save Mapping (4).  You will want to setup a mapping for any user on the server that will be sending mail.  For alerting purposes root should be enough.

image

When you are done adding mappings select Save and Apply (1) to exit back to the main Postfix Mail Server page.

image

Now you want to select Edit Config Files (1).

image

You will be adding two sections to the main.cf file (1).  Then above the smtp_sasl_password_maps line add “smtp_sasl_auth_enable=yes” (2).  Then scroll to the bottom of the file.

image

At the bottom of the file add the lines below and make sure that there is a newline at the end (3).  Then select Save (4).

##### client TLS parameters #####
smtp_tls_loglevel=1
smtp_tls_security_level=encrypt
smtp_sasl_security_options = noanonymous
smtp_generic_maps = hash:/etc/postfix/generic

image

Now everything should be setup to work.  Testing is most easily done from a command prompt.  ssh to the server and log into root.  If you haven’t already you will need to install mailutils.  Then use the command below to send a test message.

root@testshares:~# apt-get install mailutils
Reading package lists... Done
Building dependency tree
Reading state information... Done
Suggested packages:
  mailutils-mh
The following NEW packages will be installed:
  mailutils
0 upgraded, 1 newly installed, 0 to remove and 1 not upgraded.
Need to get 0 B/344 kB of archives.
After this operation, 910 kB of additional disk space will be used.
Selecting previously unselected package mailutils.
(Reading database ... 89273 files and directories currently installed.)

<messages removed to save space>

update-alternatives: using /usr/bin/mail.mailutils to provide /usr/bin/mailx (mailx) in auto mode.
root@testshares:~# echo "Test Message" | mail -s 'Test 1' user1@gmail.com

This message should end up in user1@gmail.com's mailbox. If it doesn’t you can use the tail command to see the log to see what happened.

root@testshares:~# tail /var/log/mail.log

Thanks to Steve Stonebraker at http://brakertech.com/configure-postfix-with-gmail-via-webmin/ for documenting these instructions.

Monday, December 29, 2014

pcDuino3 Nano - Installing, Setting Up and Testing Samba via Webmin

This is another in the series documenting my setup of a new home server with the Linksprite pcDuino3 Nano.  A listing for the entire series can be found here.  More information on the pcDuino3 Nano can be found at Linksprite’s website and the pcDuino website.

The first step in setting up my home server was to install and configure Samba.

These steps start with installing Samba using Webmin and configure the network for Windows.  From there they create a user, group, add the user to Samba, create a share and set protections on the share so that anyone in the group can access and create files on the share.

I am by no means a Samba expert.  I ran through the steps several times but that doesn’t mean that there could not be problems with them.  If something doesn’t work for you as shown below leave a comment and I will try and figure out what is wrong.

The final configuration for the home server will have the shares on a separate partition from the root file system.  These basic instructions create a testshare on the root drive.  I will build on them in a later post for the final setup.

This is part of my pcDuino3 Nano series of posts but it should work for webmin on other systems.

Install SAMBA from Webmin

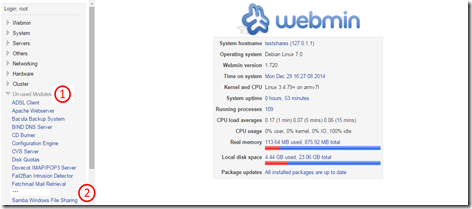
From the Webmin menu select Un-unsed Modules (1) and scroll down and select Samba Windows File Sharing (2)

image

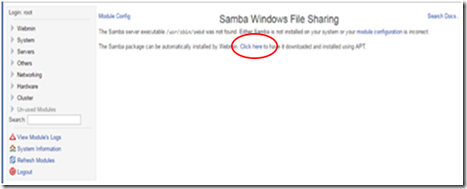
You will get a message that the samba server executable was not found and will be asked if you want to install samba. Click on the link to install samba.

image

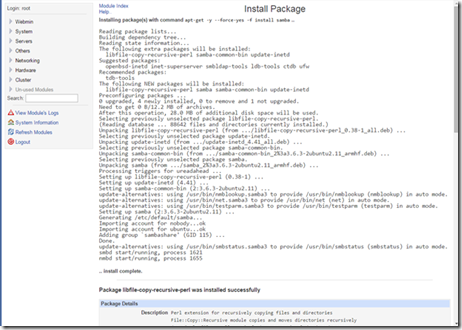
Select “Click Here” to install and samba will be installed.

image

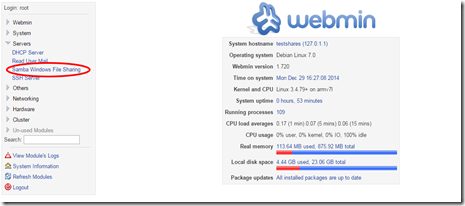
Now under Servers you will have a Samba Windows File Sharing selection.

image

Configure Network

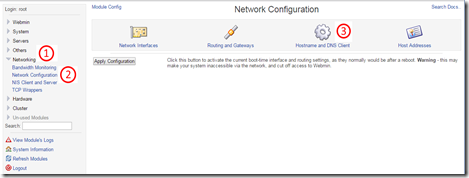
From the Webmin menu open Networking (1) and select Network Configuration (2) and then select Hostname and DNS Client (3).

image

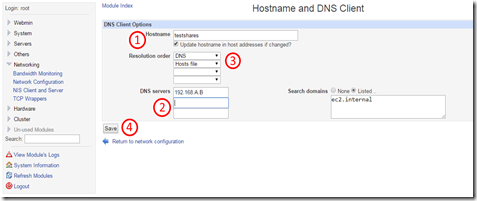
Here you can setup a name for your server (1), set your DNS Servef (2), change the resolution order to DNS (3) and the Hosts file and press Save (4).

image

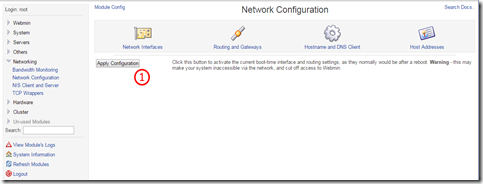
After save on the next web page select Apply Configuratio (1)

image

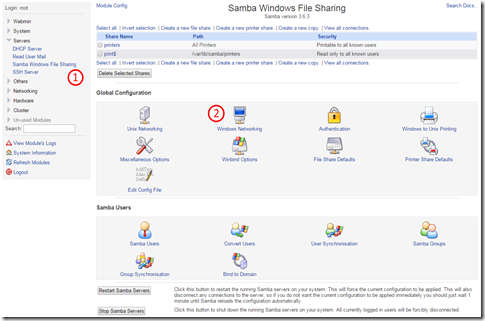
Now go back under Servers to Samba Windows File Sharing and select Windows Networking.

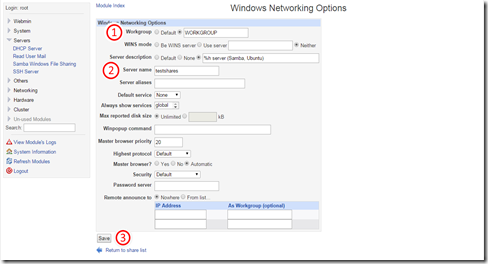
image

Enter your workgroup and server name.

image

Create a User

From the Webmin menu open System (1), select Users and Groups (2) and select Create a new user (3).

image

Enter a username (1), the user’s real name (2), set the shell as preferred (3), set a password (4), create or put the user in an existing group (5), add secondary groups of users and ssh (6) and then press Create (7)

image

You should now see your user in the user list.

image

Add the User to Samba

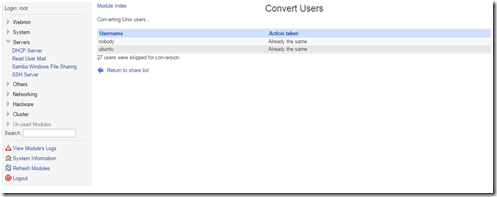
Go back to Servers (1), select Samba Windows File Sharing (2) and under Samba Users select Convert Users (3).

image

I would suggest changing the default settings to Yes  for deleting unix users that no longer exist and to lock accounts for newly created users.

image

After you select Create Users your users will be created.

image

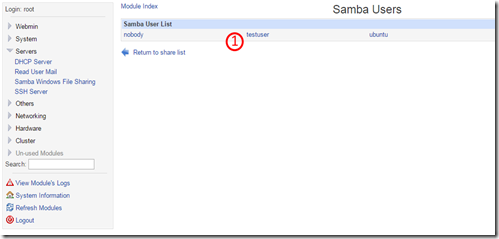
From back on the share list screen under Samba Users if you select Samba Users (1) you should see the user you created.

image

Select that user (1).

image

Update the users password (1) and select Save (2).

image

Creating a File Share

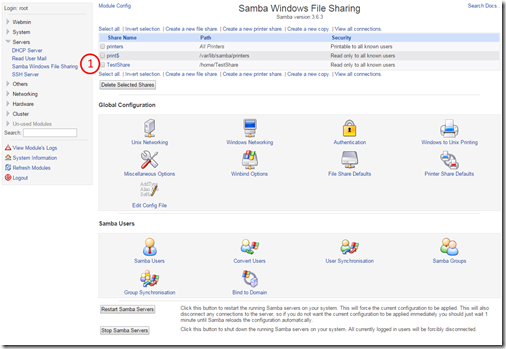
Go back to Servers (1), select Samba Windows File Sharing (2) and under at the top of the page select Create a new file share (3).

image

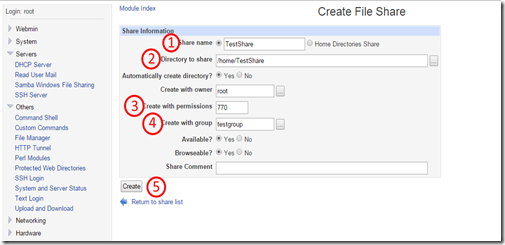
Enter a Share name (1), the directory that will be chard (2), the create permissions (3) and the group (4).  For this share I plan to use a group and put all the users who should have access to these files in that group.  As a result I setup the permissions on the directory to be 770 so group and owner have complete access but other has none.  Select Create (5) to create the share.

image

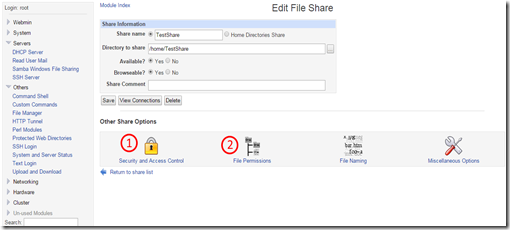
Your new share will show up in the share list at the top of the Samba Windows File Sharing page.  Select the share (1).

image

First you want to select Security and Access Control (2).

image

On the Edit Security page you will need to set Limit to possible list (1) and then add the group under Possible Groups (2) and Read / Write Groups (3).  Then select Save (4).

image

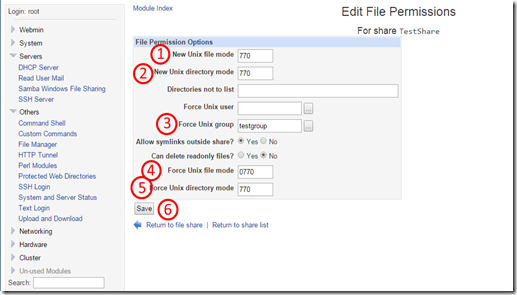
This will return you to the Edit File Share page where you now want to select File Permissions (2).  On the Edit File Permissions page you want to set New Unix file (1) and directory mode (2) to 770 and force the unix group to your group in this case testgroup (3).  Then force Unit file (4) and directory mode (5) to 0770 and 770 respectively and select Save (6).  This will result in files being owned by the user who created them and by the testgroup.  Also, other will have no access to files on the share.

image

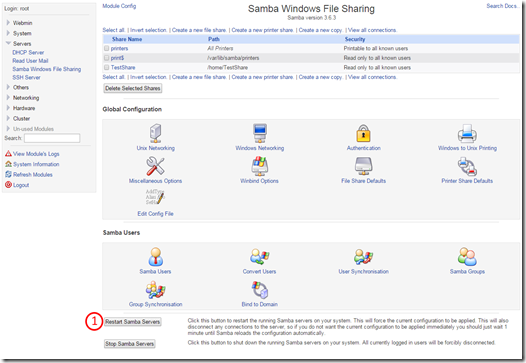
Go back to the main Samba Windows File Sharing page and Restart the Samba Server.

image

You now should have a file share that you can map to from the user you created with the password you set in Samba which is different that the logon password.  When you connect to the share using that username and password you should be able to save files to it.

pcDuino3 Nano - Webgui Install and Setup

This is another in the series documenting my setup of a new home server with the Linksprite pcDuino3 Nano.  A listing for the entire series can be found here.  More information on the pcDuino3 Nano can be found at Linksprite’s website and the pcDuino website.

As I outlined in yesterday’s post I have decided to proceed with creating my own bundle of software for my new home server.  One of my requirements is that I would like a web interface that I can manage the system with.  After some research I decided to use Webmin.

To install Webmin I followed the Debian instructions on the Webmin website.  I started by making sure all the dependencies were installed.

root@ubuntu:~# apt-get install perl libnet-ssleay-perl openssl libauthen-pam-perl libpam-runtime libio-pty-perl apt-show-versions python
Reading package lists... Done
Building dependency tree
Reading state information... Done
libpam-runtime is already the newest version.
openssl is already the newest version.
perl is already the newest version.
perl set to manually installed.
python is already the newest version.
The following extra packages will be installed:
  libapt-pkg-perl libopts25
Suggested packages:
  ntp-doc apparmor
The following NEW packages will be installed:
  apt-show-versions libapt-pkg-perl libauthen-pam-perl libio-pty-perl
  libnet-ssleay-perl libopts25
0 upgraded, 6 newly installed, 0 to remove and 1 not upgraded.
Need to get 978 kB of archives.
After this operation, 2531 kB of additional disk space will be used.
Do you want to continue [Y/n]?

<messages removed to save space>

Setting up libauthen-pam-perl (0.16-2build2) ...
Setting up libio-pty-perl (1:1.08-1build2) ...
Setting up libnet-ssleay-perl (1.42-1build1) ...
Processing triggers for libc-bin ...
ldconfig deferred processing now taking place

Once all of the dependencies were installed I downloaded the installation package using wget and installed it using dpkg.

root@ubuntu:~# wget http://prdownloads.sourceforge.net/webadmin/webmin_1.720_all.deb
--2014-12-29 15:27:23--  http://prdownloads.sourceforge.net/webadmin/webmin_1.720_all.deb

<messages removed to save space>

Connecting to superb-dca2.dl.sourceforge.net (superb-dca2.dl.sourceforge.net)|209.61.193.20|:80... connected.
HTTP request sent, awaiting response... 200 OK
Length: 21976258 (21M) [application/octet-stream]
Saving to: `webmin_1.720_all.deb'

100%[======================================>] 21,976,258  2.73M/s   in 14s

2014-12-29 15:27:37 (1.47 MB/s) - `webmin_1.720_all.deb' saved [21976258/21976258]

root@ubuntu:~# dpkg --install webmin_1.720_all.deb
Selecting previously unselected package webmin.
(Reading database ... 64220 files and directories currently installed.)
Unpacking webmin (from webmin_1.720_all.deb) ...
Setting up webmin (1.720) ...
Webmin install complete. You can now login to
https://ubuntu:10000/
as root with your root password, or as any user who can use sudo
to run commands as root.
Processing triggers for ureadahead ...

As you can see the installation is pretty simple.  Once dpkg completed I connected via my web browser to the ip address of the server using port 10000 and logged in as root.

Sunday, December 28, 2014

pcDuino3 Nano - NAS or ???

This is another in the series documenting my setup of a new home server with the Linksprite pcDuino3 Nano.  A listing for the entire series can be found here.  More information on the pcDuino3 Nano can be found at Linksprite’s website and the pcDuino website.

I started this project with the goal of replacing my home network attached storage (NAS) system.  When I originally set the NAS up I had looked at a number of software NAS solutions before deciding on Open Media Vault (OMV) running on a Raspberry Pi.  I decided on OMV because I had a Raspberry Pi and OMV had a binary distribution image for the Raspberry Pi and an installed base.

For this upgrade I was using the pcDuino3 Nano with an AllWinner A20 which is an ARMv7 processor.  While OMV has a good installed base within the RasperryPi (ARMv6) community it doesn’t have the same level of adoption with the ARMv7 processors.  Given the ARMv7 installed base situation with OMV I decided I would look at other software NAS Solutions.

The two software NAS solutions that have the largest installed bases are FreeNAS and NAS4Free.  These systems have common roots that diverged in 2011 and run on FreeBSD.  What turned me away from them is that while FreeBSD has ARM ports and lists the Allwinner A10 and A20 as supported it doesn’t appear to be widely used on pcDuino systems.

While reviewing the additional software NAS offerings I came to the realization that NAS was really just one component that it would be nice to host on this server.  As I looked at other solutions it turned out that most of those targeted at the home market provide additional services through plugins or bundling in other software. 

As I couldn’t find an existing solution that met my needs I decided that I would create a bundle of packages that meet my requirements.

The heart of software NAS, and many hardware NAS solutions, is the SAMBA.  SAMBA is defined on the main page of www.samba.org as “standard Windows interoperability suite of programs for Linux and Unix … providing provided secure, stable and fast file and print services for all clients using the SMB/CIFS protocol, such as all versions of DOS and Windows, OS/2, Linux and many others.”  Given my file sharing requirement the first package in my bundle would need to be SAMBA. 

One of the things that I really liked about OMV is the webgui.  Anything I needed to do to my OMV NAS could be done through the web interface.  Any replacement for my existing NAS would need a webgui and that seemed like a good place to work on next.

Thursday, December 25, 2014

It Worked for Me - Olimex MOD-WIFI-ESP8266-DEV

I ordered two MOD-WIFI-ESP8266-DEV devices from MicroController Pros LLC and as luck would have it they arrived December 24th just in time for Christmas.

Today I soldered on the pins, plugged one into a breadboard and connected them to a FTDI Basic 3.3V from Sparkfun.  I connected the FTDI Basic to the MOD-WIFI-ESP8266-DEV like this:

FTDI ESP8266-DEV
DTR  
RX1 Pin 3
TX1 Pin 4
V3.3 Pin 1
CTS  
GND Pin 2

Then I connected the FTDI Basic to my computer and set the COM port to 115200 and typed in AT and go an OK back.  Next up was to connect to my wifi network and this took me a bit of time.  I found out that you needed to execute the following commands:

AT+CWMODE=3 – this sets the mode so it will connect to access points.

AT+RST – this will reset the device and in my case the device had to be reset after it was changed to CWMODE=3.  Until I reset it all I got was ERROR responses back.

AT+CWLAP – this will get you a list of the WAPs it sees.

AT+CWJAP=”<ssid>”,”<password>” – this will connect you to your wifi network.

AT+CWJAP? – this will tell you if you are connected.

AT+CIFSR – this will give you the IP address of the card.  You should be able to ping this.

More to follow…

Wednesday, December 24, 2014

pcDuino3 Nano - Adding a SATA Disk - System Setup

This is another in the series documenting my setup of a new home server with the Linksprite pcDuino3 Nano.  A listing for the entire series can be found here.  More information on the pcDuino3 Nano can be found at Linksprite’s website and the pcDuino website.

Now that I have the corrupted nand root file system resolved the next step was to configure the system with the root file system on the SATA drive.

I booted the system without the sd card as I Once the system booted the first thing I did was to check to make sure that the system could see the drive.  There are a number of ways to do this.  I used the lsblk command:

root@ubuntu:~# lsblk
NAME    MAJ:MIN RM   SIZE RO TYPE MOUNTPOINT
sda       8:0    0 931.5G  0 disk
nand     93:0    0   3.6G  0 disk
├─nanda  93:1    0    32M  0 part
├─nandb  93:2    0    16M  0 part
├─nandc  93:3    0    16M  0 part
└─nandd  93:4    0   3.5G  0 part /

The lsblk command reports two block devices.  These are sda which is the SATA disk I just connected to the system and the onboard NAND storage.  You can tell that the system is running from the root file system nandd by looking at the mount point.

1) Format the drive.  This is done using fdisk,  In my case I was looking to have one partition that consisted of the entire drive.

root@ubuntu:~# fdisk /dev/sda

The device presents a logical sector size that is smaller than
the physical sector size. Aligning to a physical sector (or optimal
I/O) size boundary is recommended, or performance may be impacted.

Command (m for help): n
Partition type:
   p   primary (0 primary, 0 extended, 4 free)
   e   extended
Select (default p): p
Partition number (1-4, default 1): <cr>
Using default value 1
First sector (2048-1953525167, default 2048):
<cr>
Using default value 2048
Last sector, +sectors or +size{K,M,G} (2048-1953525167, default 1953525167):
Using default value 1953525167

Command (m for help): t
Selected partition 1
Hex code (type L to list codes): 83

Command (m for help): w
The partition table has been altered!

Calling ioctl() to re-read partition table.
Syncing disks.

If you run the lsblk command again you will see the changes.

root@ubuntu:~# lsblk
NAME    MAJ:MIN RM   SIZE RO TYPE MOUNTPOINT
sda       8:0    0 931.5G  0 disk
└─sda1    8:1    0 931.5G  0 part
nand     93:0    0   3.6G  0 disk
├─nanda  93:1    0    32M  0 part
├─nandb  93:2    0    16M  0 part
├─nandc  93:3    0    16M  0 part
└─nandd  93:4    0   3.5G  0 part /

We now have a partition sda1.

2) Copy the root file system to the SATA disk.  Insert the sd card and run lsblk and you now have three block devices.  We will be copying the root file system which is on the second partition of the sd card on /dev/mmcblkl0p2.

root@ubuntu:~# lsblk
NAME        MAJ:MIN RM   SIZE RO TYPE MOUNTPOINT
sda           8:0    0 931.5G  0 disk
└─sda1        8:1    0 931.5G  0 part
nand         93:0    0   3.6G  0 disk
├─nanda      93:1    0    32M  0 part
├─nandb      93:2    0    16M  0 part
├─nandc      93:3    0    16M  0 part
└─nandd      93:4    0   3.5G  0 part /
mmcblk0     179:0    0   7.4G  0 disk
├─mmcblk0p1 179:1    0    16M  0 part /media/CDE1-5BFE
└─mmcblk0p2 179:2    0   7.4G  0 part /media/7f1334b8-5b94-49a2-aa48-e0d31f19ef9

root@ubuntu:~# dd if=/dev/mmcblk0p2 of=/dev/sda1
3592+0 records in
3592+0 records out
3766484992 bytes (3.8 GB) copied, 345.299 s, 10.9 MB/s

3) When the dd command completes there are several additional steps to do with the SATA disk.

Labeling the disk is optional.  If you wish to label the disk you will use the e2label command.

The next step is to generate a new uuid for the SATA disk.  As the data on the SATA disk is just a copy of the sd card it will have the same uuid.  The system will work this way but as uuid’s are supposed to be unique on a system it isn’t good.  The new uuid is set on the drive using the tune2fs command.

root@ubuntu:~# e2label /dev/sda1 System
root@ubuntu:~# tune2fs /dev/sda1 -U `cat /proc/sys/kernel/random/uuid`

4) Set the system to load the root file system form the SATA disk.  This is done by updating uEnv.txt on the sd card.  Using lsblk you will see that the boot partition is mounted on /mediaCDE1-5BFE so using a text editorthe file is updated.

root@ubuntu:~# lsblk
NAME        MAJ:MIN RM   SIZE RO TYPE MOUNTPOINT
sda           8:0    0 931.5G  0 disk
└─sda1        8:1    0 931.5G  0 part
nand         93:0    0   3.6G  0 disk
├─nanda      93:1    0    32M  0 part
├─nandb      93:2    0    16M  0 part
├─nandc      93:3    0    16M  0 part
└─nandd      93:4    0   3.5G  0 part /
mmcblk0     179:0    0   7.4G  0 disk
├─mmcblk0p1 179:1    0    16M  0 part /media/CDE1-5BFE
└─mmcblk0p2 179:2    0   7.4G  0 part /media/7f1334b8-5b94-49a2-aa48-e0d31f19ef9

root$ubuntu:~#: nano /media/CDE1-5BFE/uEnv.txt

The line that needs to be changed is the one that starts with mmc_root.

/dev/mmcblk0p2 –> /dev/sda1

baudrate=115200
boot_nand=fatload mmc 0 0x43000000 script.bin && fatload mmc 0 0x48000000 ${kernel} && bootm 0x48000000
bootcmd=if run loadbootenv; then env import -t ${scriptaddr} ${filesize};fi;run setargs boot_mmc;
bootdelay=3
bootenv=uEnv.txt
console=ttyS0,115200
filesize=4096
kernel=uImage
loadbootenv=fatload mmc 0 $scriptaddr ${bootenv}
loglevel=8
scriptaddr=0x44000000
mmc_root=/dev/mmcblk0p2
recovery_key_value_max=0x13
recovery_key_value_min=0x10
setargs=setenv bootargs console=${console} console=tty1 root=${mmc_root} loglevel=${loglevel} ${panicarg} ${extraargs}

5) Reboot the system and you should boot into the root file system on your SATA drive.

Tuesday, December 23, 2014

pcDuino3 Nano–Problems with the NAND Root File System

This is another in the series documenting my setup of a new home server with the Linksprite pcDuino3 Nano.  A listing for the entire series can be found here.  More information on the pcDuino3 Nano can be found at Linksprite’s website and the pcDuino website.

After connecting the SATA drive I had hoped to move on to setting up the system to recognize the drive and then to use it for the root file system.  However, I ran into a snag…

Some where along the way the root file system in nand had become corrupted.  I subsequently found out that it appeared the corruption occurred when I used apt-get to install the latest updates.  This was a problem because I planned to boot from nand and then copy the root file system from the sd card on to the SATA disk.

Initially I didn’t realize that the problem was with the apt-get so I re-installed the 20141205 kernel and the 20140807 root file system.  Once this was complete I used apt-get to install the latest updates and when the process was complete rebooted and found out I again had a corrupted file system.

At this point I decided to create an image of the root file system on the sd card which was current as of 20141222 and try and reinstall the 20141205 kernel with my 20141222 root file system.  This worked.

Below is the process I used for creating an image of the root file system on the sd card.

Creating an Root File System Image

I did this using a laptop that was running Ubuntu.  The process goes like this:

1. Copy the root file system from the sd card to disk.  First, determine the device for your sd card.  Once you have the device copy the second partition to disk.

ubuntu@ubuntu:~$ lsblk
NAME   MAJ:MIN RM   SIZE RO TYPE MOUNTPOINT
sda      8:0    0 232.9G  0 disk
├─sda1   8:1    0  14.7G  0 part
├─sda2   8:2    0 118.2G  0 part
├─sda3   8:3    0  97.1G  0 part /
├─sda4   8:4    0     1K  0 part
└─sda5   8:5    0     3G  0 part
sr0     11:0    1  1024M  0 rom
sdb      8:16   1   7.4G  0 disk
├─sdb1   8:17   1    16M  0 part
└─sdb2   8:18   1   7.4G  0 part
ubuntu@ubuntu:~$ sudo dd if=/dev/sdb2 of=file.img
15529984+0 records in
15529984+0 records out
7951351808 bytes (8.0 GB) copied, 505.368 s, 15.7 MB/s

The lsblk command will report all the block structured devices.  In this case we can see that there are two disks sda and sdb and that sda has a partition sda3 that is the root mount point.  Based on this we want sdb2 as sdb1 is the boot partition.

2. Mount and check the image copy.  Using losetup mount the image file and run fsck to make sure it is in good order.  losetup is a nice utility to know about as it allows you to add image files as loopback devices and operate on them.

ubuntu@ubuntu:~$ sudo losetup -f --show file.img
/dev/loop0 ubuntu@ubuntu:~$ sudo e2fsck -fy /dev/loop0
e2fsck 1.42 (29-Nov-2011)
Pass 1: Checking inodes, blocks, and sizes
Pass 2: Checking directory structure
Pass 3: Checking directory connectivity
Pass 4: Checking reference counts
Pass 5: Checking group summary information
/dev/loop0: 70827/473280 files (1.3% non-contiguous), 416578/1941248 blocks

3. Resize the file system and the image file.  I was using an 8GB sd card and had expanded the file system to use the whole card.  To speed the update process I wanted to reduce the size of my root file system and the sd image.  To resize the file system I used the resize2fs command and then using dd created a copy of the image file.  As I was done with the loopback device I deleted it.

For the dd command I used a 1K block size and a count that was the same as the K size I had used with resize2fs.

ubutntu@ubuntu:~$ sudo resize2fs -p /dev/loop0 1677721K
resize2fs 1.42 (29-Nov-2011)
Resizing the filesystem on /dev/loop0 to 419430 (4k) blocks.
Begin pass 2 (max = 42302)
Relocating blocks             XXXXXXXXXXXXXXXXXXXXXXXXXXXXXXXXXXXXXXXX
Begin pass 3 (max = 60)
Scanning inode table          XXXXXXXXXXXXXXXXXXXXXXXXXXXXXXXXXXXXXXXX
Begin pass 4 (max = 6053)
Updating inode references     XXXXXXXXXXXXXXXXXXXXXXXXXXXXXXXXXXXXXXXX
The filesystem on /dev/loop0 is now 419430 blocks long.
ubuntu@ubuntu:~$ sudo losetup -d /dev/loop0
ubuntu@ubuntu:~$ dd if=file.img of=file2.img bs=1024 count=1677721
1677721+0 records in
1677721+0 records out
1717986304 bytes (1.7 GB) copied, 86.4562 s, 19.9 MB/s

4. Replace the Image on the Update SD Card.  Insert the second sd card you created in the pcDuino3 Nano – Kernel Upgrade at step 7 that has the 20140807 root file system and update.sh on it.  You will need to delete the old image file pcduino3_ubuntu_20140807.img and replace it with the image you created above.

You could also use a blank vfat formatted sd card with slightly different steps.  As the sd card is blank you would just copy the image file created above to the sd card.

ubuntu@ubuntu:~$ lsblk
NAME   MAJ:MIN RM   SIZE RO TYPE MOUNTPOINT
sda      8:0    0 232.9G  0 disk
├─sda1   8:1    0  14.7G  0 part
├─sda2   8:2    0 118.2G  0 part
├─sda3   8:3    0  97.1G  0 part /
├─sda4   8:4    0     1K  0 part
└─sda5   8:5    0     3G  0 part
sr0     11:0    1  1024M  0 rom
sdb      8:16   1   1.9G  0 disk
└─sdb1   8:17   1   1.9G  0 part /media/C311-0715
ubuntu@ubuntu:~$ ls -l /media/C311-0715
total 1677760
-rw-r--r-- 1 gjdonaldson gjdonaldson 1717986304 Aug  7 02:58 pcduino3_ubuntu_20140807.img
-rw-r--r-- 1 gjdonaldson gjdonaldson        618 Aug  7 02:58 update.sh
ubuntu@ubuntu:~$ rm /media/C311-0715/pcduino3_ubuntu_20140807.img
ubuntu@ubuntu~$ cp file2.img /media/C311-0715/pcduino3_ubuntu_20141223.img

5. Update the copy of update.sh on the sd card replacing the image file name on line 3 with the name of the image you just copied to the sd card and save the file back to the sd card.

pcduino3_ubuntu_20140807.img –> pcduino3_ubuntu_20141223.img

If you are using the alternative method that started with the blank vfat sd card.  You will need to create a file on it update.sh that contains the lines below with the name of the image file above on line 3 after IMG=.

#!/bin/sh
cd `dirname $0`
IMG=pcduino3_ubuntu_20140807.img

IMG_SIZE=`du -s $IMG  | cut -f1`
BURN_TIME=`expr $IMG_SIZE / 1024 / 3 / 60`
echo -e "\twriting $IMG to nand flash\n"
echo -e "\tit will take about $BURN_TIME minutes to finish..."

time dd if=$IMG of=/dev/nandd bs=4M && sync
if [ $? -eq 0 ]; then
    echo "update finished"
    killall blink_led.sh
    /blink_led.sh 18 1000000 &
    /blink_led.sh 19 1000000 &
else
    echo "write ubuntu to nand failed"
    killall blink_led.sh
    /blink_led.sh 18 100000 &
    /blink_led.sh 19 100000 &
    exit 1
fi

6) Power off your pcDuino3 Nano and put the sd card with the 20141205 kernel update on it into the pcDuino3 Nano’s sd slot and apply power to the pcDuino3 Nano.  If you don’t have an sd card with this on it you can follow the steps in pcDuino3 Nano – Kernel Upgrade to generate the card.

While the kernel is loading LED 4 will flash.  Once the load is complete it will turn off.  When it does turn off the pcDuino3 Nano and remove the sd card.

7) Put it in the sd card we updated in the steps above into the sd card slot of the pcDuino3 Nano and power up the system.  While the Ubuntu files are loading LED 3 will be on and LED 4 will flash.  When the load is finished both LED 3 and LED 4 will blink in unison.

8) Turn off the pcDuino3 Nano, remove the sd card and turn it back on.  It should boot into the updated root file system.

Monday, December 22, 2014

pcDuino3 Nano - Adding a SATA Disk - Connecting the Drive

This is another in the series documenting my setup of a new home server with the Linksprite pcDuino3 Nano.  A listing for the entire series can be found here.  More information on the pcDuino3 Nano can be found at Linksprite’s website and the pcDuino website.

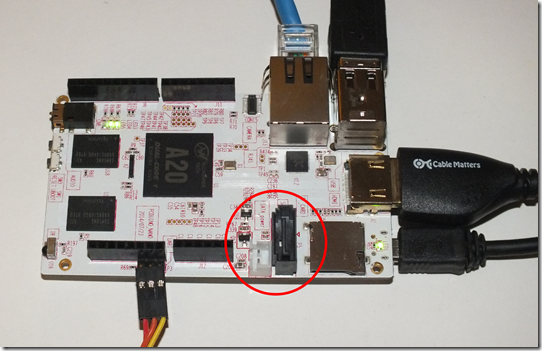
One of the things that drew me to the pcDuino3 Nano as a replacement for my home NAS system was the ability to connect a SATA disk to it.  The pcDuino3 and pcDuino3 Nano both have a SATA host port and a 5v power connector.  The 5v power connector limits you to 2.5” SATA drives.

pcDuino3NanoSATACircle

My original plan was to use a SATA dock to house and power the drive.  However, this didn’t work out as the pcDuino3 Nano has a SATA host port which is a different connector than an eSATA port.  This left me with a problem as I was using a 3.5” SATA drive which requires 12v and 5v and the pcDuino3 Nano only supplies 5v.  I overcame this problem by using a cable with a SATA power connector on one end and a 4 pin molex connector on the other.  This allows a 3.5” SATA drive to be powered from an ATX power supply or anything with a 4 pin molex connector with 12v and 5v. 

In my case I had a power adapter that supplied both voltages and by cutting off the original power connector and replacing it with a 4 pin molex male connector I was able to supply power to the disk drive.  While I was at it I cut off a USB micro b connector from a wall wart and connected that to the 5v lead to power the pcDuino3 Nano.

As shown in the picture below I used an old external USB drive enclosure for the drive.

Setup

After checking all the connections I plugged in the power adapter and booted the pcDuino3 Nano.

Sunday, December 21, 2014

pcDuino3 Nano - Creating a Bootable SD Card from NAND

This is another in the series documenting my setup of a new home server with the Linksprite pcDuino3 Nano.  A listing for the entire series can be found here.  More information on the pcDuino3 Nano can be found at Linksprite’s website and the pcDuino website.

The pcDuino family of systems can boot from the onboard NAND storage or from an SD card.  There are reasons for why you may want to boot from and SD card rather than NAND.  One significant reason is that you may need more than 4 GB of storage for the root file system on your system which exceeds the amount of NAND.

One of the very nice value added features that pcDuino provides is a utility that allows you to copy the kernel and operating system files to an SD card which is bootable.  The utility is part of the board-config.sh script which can be run from a terminal window using the sudo board-config.sh command and then following the prompts.

The process also includes instructions for expanding the root file system so that you can access the additional storage capacity of your SD card.

pcDuino3 Nano - Ubuntu Updates

This is another in the series documenting my setup of a new home server with the Linksprite pcDuino3 Nano.  A listing for the entire series can be found here.  More information on the pcDuino3 Nano can be found at Linksprite’s website and the pcDuino website.

Now that we have completed the kernel upgrade the next step is to download and apply Ubuntu upgrades.  You may have caught that the date in the filename of the Ubuntu image was August 7, 2014.  That means that any updates that have been made available for Ubuntu since that time need to be applied to the system.

Ubuntu components are updated on an ongoing basis and this process can be used to update them on your system even if you haven’t updated the kernel.

Note

There is a lot of good information on www.pcduino.com.  On this topic you should check out the blog post Chapter 1: Hardware and Software Introductions of pcDuino.

You will need to be connected to the Internet for this process.

1) From a terminal window (or the console connection if you have one) you type in the sudo apt-get update.  If you get back a long stream of messages connecting to websites and downloading data as shown below that everything is working correctly.

ubuntu@ubuntu:~$ sudo apt-get update
Ign
http://ppa.launchpad.net precise InRelease
Ign
http://ports.ubuntu.com precise InRelease
Ign
http://ports.ubuntu.com precise-security InRelease
Ign
http://ports.ubuntu.com precise-updates InRelease
Hit
http://ppa.launchpad.net precise Release.gpg
Hit
http://ports.ubuntu.com precise Release.gpg
Get:1
http://ports.ubuntu.com precise-security Release.gpg [198 B]
Get:2
http://ports.ubuntu.com precise-updates Release.gpg [198 B]
Hit
http://ppa.launchpad.net precise Release

<messages removed to save space>

Fetched 396 B in 8s (49 B/s)
Reading package lists... Done
W: Conflicting distribution:
http://www.wiimu.com pcduino Release (expected pcduino but got )

The last line you get is warning that one of the repositories isn’t configured correctly this isn’t a fatal error and the process completes.

If you get back a slow stream of message that start with Err you are most likely not connected to the Internet.

ubuntu@ubuntu:~$ sudo apt-get update
Err
http://www.wiimu.com pcduino InRelease

Err http://ppa.launchpad.net precise InRelease

Err http://ports.ubuntu.com precise InRelease

Err http://www.wiimu.com pcduino Release.gpg
  Temporary failure resolving 'www.wiimu.com'
Err
http://ppa.launchpad.net precise Release.gpg
  Temporary failure resolving 'ppa.launchpad.net'
Err
http://ports.ubuntu.com precise-security InRelease

^C


Confirming Internet Connectivity

You can confirm Internet connectivity using the ping command as shown below.  If you get a series or replies you are connected to the Internet.

ubuntu@ubuntu:~$ ping -c 5 www.google.com
PING www.google.com (74.125.196.106) 56(84) bytes of data.
64 bytes from yk-in-f106.1e100.net (74.125.196.106): icmp_req=1 ttl=246 time=24.0 ms
64 bytes from yk-in-f106.1e100.net (74.125.196.106): icmp_req=2 ttl=246 time=27.0 ms
64 bytes from yk-in-f106.1e100.net (74.125.196.106): icmp_req=3 ttl=246 time=25.2 ms
64 bytes from yk-in-f106.1e100.net (74.125.196.106): icmp_req=4 ttl=246 time=25.6 ms
64 bytes from yk-in-f106.1e100.net (74.125.196.106): icmp_req=5 ttl=246 time=24.6 ms

--- www.google.com ping statistics ---
5 packets transmitted, 5 received, 0% packet loss, time 4006ms
rtt min/avg/max/mdev = 24.003/25.340/27.070/1.039 ms

If the system appears to hang and eventually comes back as follows you do not have Internet connectivity.

ubuntu@ubuntu:~$ ping -c 5 www.google.com
ping: unknown host
www.google.com

 
2) The update phase updates the list of current software from the to your computer but doesn’t apply any of the updates.  The next step sudo apt-get upgrade constructs a list of the packages that need updating and prompts you to confirm that you want to continue.  If you type a return or Y the process will continue.  If you type an n the process will stop without applying any updates.
 

ubuntu@ubuntu:~$ sudo apt-get upgrade
Reading package lists... Done
Building dependency tree
Reading state information... Done
The following packages have been kept back:
  libgrip0
The following packages will be upgraded:
  alsa-base alsa-utils apt apt-transport-https apt-utils base-files bash bc
  binutils bsdutils busybox-initramfs ca-certificates chromium-browser

<messages removed to save space>

  xserver-xorg-video-all xserver-xorg-video-nouveau
275 upgraded, 0 newly installed, 0 to remove and 1 not upgraded.
Need to get 216 MB of archives.
After this operation, 33.8 MB of additional disk space will be used.
Do you want to continue [Y/n]?

Once you continue the system will download all the updates and apply them on your system.  This process can take quite a bit of time.

<messages removed to save space>

Installing new version of config file /etc/pam.d/lightdm-autologin ...

Configuration file `/etc/init/lightdm.conf'
==> Modified (by you or by a script) since installation.
==> Package distributor has shipped an updated version.
   What would you like to do about it ?  Your options are:
    Y or I  : install the package maintainer's version
    N or O  : keep your currently-installed version
      D     : show the differences between the versions
      Z     : start a shell to examine the situation
The default action is to keep your current version.
*** lightdm.conf (Y/I/N/O/D/Z) [default=N] ?
Setting up lightdm-gtk-greeter (1.1.5-0ubuntu1.1) ...
Setting up openjdk-6-jre-lib (6b33-1.13.5-1ubuntu0.12.04) ...

<messages removed to save space>

Installing new version of config file /etc/rsyslog.conf ...
rsyslog stop/waiting
rsyslog start/running, process 12800
Setting up ifupdown (0.7~beta2ubuntu11.1) ...
Installing new version of config file /etc/init/network-interface.conf ...
Setting up network-manager-gnome (0.9.4.1-0ubuntu2.3) ...
Setting up resolvconf (1.63ubuntu16) ...
Installing new version of config file /etc/ppp/ip-down.d/000resolvconf ...
Installing new version of config file /etc/ppp/ip-up.d/000resolvconf ...
Setting up ubuntu-minimal (1.267.1) ...
Processing triggers for libc-bin ...
ldconfig deferred processing now taking place
Processing triggers for libgdk-pixbuf2.0-0 ...
Processing triggers for initramfs-tools ...
Processing triggers for resolvconf ...
ubuntu@ubuntu:~$

When you get back to the prompt all the updates have been applied.

Saturday, December 20, 2014

pcDuino3 Nano - Kernel Upgrade

This is the first of a series documenting my setup of a new home server with the Linksprite pcDuino3 Nano.  A listing for the entire series can be found here.  More information on the pcDuino3 Nano can be found at Linksprite’s website and the pcDuino website.

When I booted the fresh out of the box pcDuino3 Nano the kernel it booted from NAND was built on 10-15-2014. A check of the pcDuino3 Nano download page on the LinkSprite website showed that there was a more current version built on 12-5-2014.

I checked the version of the kernel running as shown below:

root@ubuntu:~# uname -a
Linux ubuntu 3.4.79+ #5 SMP PREEMPT Wed Oct 15 14:06:46 CST 2014 armv7l armv7l armv7l GNU/Linux
root@ubuntu:~#

The new kernel resolved the Aurduino-ish IDE corruption issue due to a serial port bug.  I figured before I got started with anything I would upgrade to the latest kernel.

On the pcDuino family of systems there are two methods for upgrading the software running from NAND.

  1. You can use the LiveSuit utility which loads software from a windows computer over usb.
  2. You can use the PhoenixCard utility which writes a specially formatted sd card.  This card is inserted in the system and when it is powered up it loads the new kernel.

I chose to use PhoenixCard. 

Note: I have a USB TTL cable connected to the console pins or the pcDuino3 Nano.  While this isn’t a requirement to complete this process it helps to be able to see the messages as the print.

image

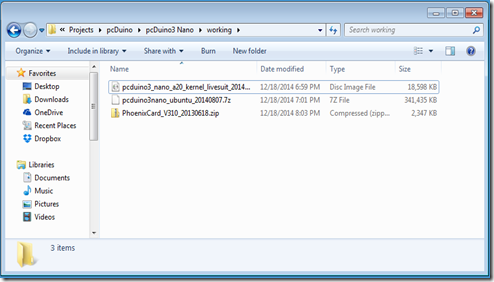
1) The first step was to download the kernel image and the Ubuntu image which is done from the pcDuino3 Nano download page.  You also need to download a copy of PhoenixCard.

The version of PhoenixCard, Phoenix_V309, that is on the pcDuino3 Nano download page was flagged by Norton Internet security as a problem.  As a result I ended up using PhoenixCard_v310_20130618 which I found via Google here: https://drive.google.com/file/d/0B38hUt6ypQXDVTB6cWJXZ3ZGNkE/edit?usp=sharing

Save the files on your system.

image

2) Extract PhoenixCard and run PhoenixCard.exe.

image

3) You will get prompted to allow the program from an unknown publisher to make changes to your system.  You will need to say yes nd you will end up in PhoenixCard 3.10. PhoenixCard does an update check which starts out in Chinese but ends with a window in English.

image

4) Click on the “Img File” button and select “cduino3_nano_a20_kernel_livesuit_20141205.img”. 

image

5) Check to make sure the disk in the disk window is correct and select “Burn”.  After the burn completes you will see the following messages in the Option window. 

  • There is a note on the pcDuino3 Nano download page that says with some internal readers you may be a “Card Preprocess Failed !1012” due to the fact that they cannot write a partition table.
  • I ran into an interesting problem when my sd card’s lock tab ended up in the locked position.  PhoenixCard would say it could format the card but the burn would fail.  If the burn fails check your lock tab.

image

6) Power off your pcDuino3 Nano and take the sd card out of your computer and put it into the pcDuino3 Nano’s sd slot.  Apply power to the pcDuino3 Nano. 

While the kernel is loading LED 4 will flash.  Once the load is complete it will turn off.  When it does turn off the pcDuino3 Nano and remove the sd card.

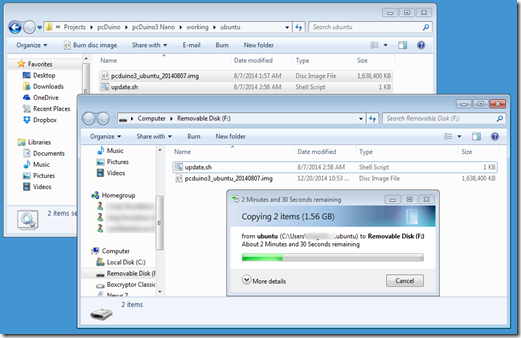
7) Next you need to extract the Ubuntu files from the archive and write them to an sd card. 

If you use the same sd card you used for the kernel load make sure you reformat the card before you write the ubuntu files to it

You can do this with the PhoenixCard utility or another sd card formatting utility.

image

8) Once the files have been written to the sd card take it out of your system and put it in the sd card slot in the pcDuino3 Nano and power up the system.  While the Ubuntu files are loading LED 3 will be on and LED 4 will flash.  When the load is finished both LED 3 and LED 4 will blink in unison.

9) Turn off the pcDuino3 Nano, remove the sd card and turn it back on.  It should boot into the updated kernel.

root@ubuntu:~# uname -a
Linux ubuntu 3.4.79+ #2 SMP PREEMPT Fri Dec 5 17:23:11 CST 2014 armv7l armv7l armv7l GNU/Linux
root@ubuntu:~#

Friday, December 19, 2014

pcDuino3 Nano

Thanks to the folks at LinkSprite a pcDuino3 Nano recently arrived in my mailbox.  The pcDuino3 is a later generation of the pcDuino which I got in March 2013.  I really enjoyed working with the original pcDuino.  I used it on in a number of projects which are documented in this blog

I found the pcDuino to be a usable computer with easy access to the basic hardware level.  Unlike some other similar systems you can  boot into a windowed environment and get very reasonable performance.

My positive experiences with the first pcDuino led me back to LinkSprite when I started looking for a  a new system to host my home network attach storage system.  The specifications for the pcDuino3 Nano sold me on it and I couldn’t wait to get my hands on one.

What I liked about the pcDuino3 Nano was that it has a decent amount of processing power, a SATA port, GB ethernet and at $39.99 a very attractive price.  Over the next week or so I plan to document my experiences putting this system through its paces and then setting up the NAS system.

pcDuino3Nanov2

The picture above is where I was about 10 minutes after unboxing the pcDuino3 Nano.  I had it plugged into my network and into a monitor with a keyboard, a mouse and a console cable.  I applied power and it booted me into Lubuntu 12.04.

I plan to post updates and tutorials on this project over the next several months.

More to follow…